Got questions? Leave a comment below. You can also subscribe to be notified when we release new chapters.
Cocos2d-X Tutorial
Now that you’ve had a C++ refresher, it’s time to get a grasp on the basics of Cocos2d-X.
In this chapter, we will be learning how to create a scene, load a sprite and drag it around via touch control (or mouse control in the case of Windows, Mac or Linux platforms). It’s simple stuff and I’m sure you’ll get the hang of it quickly.
### SpriteDraggerX on GitHub
To follow along, please get the source code and project files for [SpriteDraggerX][1]. It's a minimal Cocos2d-X project showing how to drag a sprite around the screen.
SpriteDraggerX uses [RapidGame][2]'s prebuilt Cocos2D-X libraries. Make sure you have [Node][3] and [Git][4], then:
sudo npm install rapidgame -g
rapidgame prebuild
cd SpriteDraggerX
rm lib
rapidgame init .
This will symlink a `lib` folder to RapidGame's prebuilt headers and libraries. You'll then be able to compile and run SpriteDraggerX.
Note that SpriteDraggerX is an iOS-only project. The point is to teach you the basics of Cocos2d-X without overwhelming you with the details of creating multiple projects for multiple platforms. Rest assured though, we will be covering multiple platforms in a later chapter.
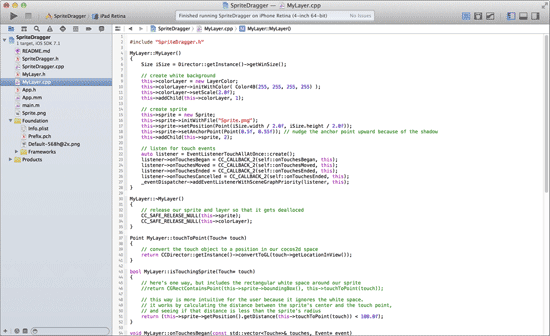
The SpriteDraggerX project opened in Xcode
### A Basic Cocos2d-X Project
Open up the project's SpriteDragger.xcodeproj file. This project is intended to be the simplest possible Cocos2d-X code, so there are no extraneous files whatsoever.
The project includes:
* main.m: Launches the app and creates the application delegate.
* App.h/.mm: The application delegate. Sets up Cocos2d-X and passes control to SpriteDragger.
* SpriteDragger.h/.cpp: A subclass of Cocos2d-X's `Application` object. Creates a blank `Scene` and a `Layer` object as its child.
* MyLayer.h/.cpp: A `Layer` subclass containing a sprite and a background layer object. The `MyLayer` object handles the touch input and drags the sprite around the screen, animating a little drop effect when the sprite is finished dragging.
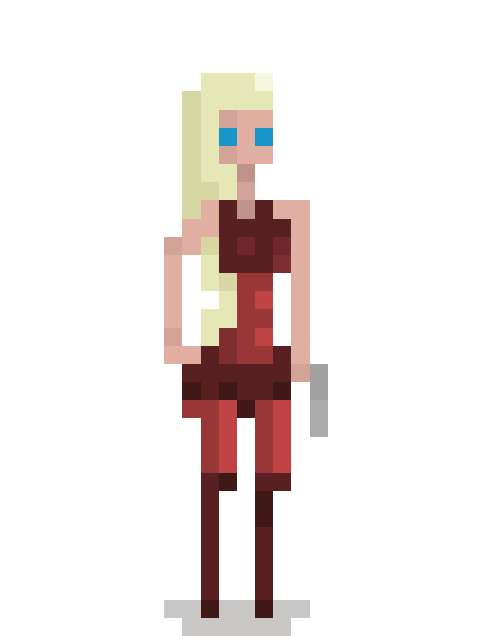
* Sprite.png: The sprite to be dragged.
 The sprite we will be dragging around
Make sure you've run the setup instructions above to create the proper `lib` folder symlink, then click Xcode's Run button and test out the project.
Drag the sprite around the screen. When you drop it, a little scaling animation will be played.
 The SpriteDragger app in action... suspenseful action
### The App Delegate
iOS apps generally start with an app delegate object.
A delegate is simply an object which implements a few known methods. In Objective C, they are written using protocols. In C++, they are pure virtual classes.
In the case of an iOS app delegate, the first and most important method to implement is called `applicationDidFinishLaunching`. It is called when (obviously) the application has finished launching. This is where your app takes control and goes about its purpose.
SpriteDraggerX's app delegate is contained in App.h and App.mm. Give these files a skim. You'll see that the app delegate sets up the window, the OpenGL view and Cocos2d-X in the `setupGraphics` method.
After the graphics are set up, it runs the shared `Application`, which happens to be the `SpriteDragger` object contained in SpriteDragger.h/.cpp.
### Scenes (cocos2d::Scene)
The SpriteDragger object simply creates a blank `Scene` and then adds a `MyLayer` (subclass of `Layer`) object as a child.
bool SpriteDragger::applicationDidFinishLaunching()
{
// create a generic scene
auto scene = Scene::create();
// add the layer
auto layer = new MyLayer;
scene->addChild(layer, 1);
layer->release(); // addChild() retained so we release
// run the first scene
Director::getInstance()->runWithScene(scene);
return true;
}
So what are scenes and layers?
Scenes define different modes of your game. You might have a main menu in one scene and the actual game in another. Cocos2d-X makes it really easy to run, swap, push, pop and transition between scenes.
Every Cocos2d-X app needs at least one scene. As we've already covered, SpriteDraggerX's scene is created in SpriteDragger.cpp.
Scenes are invisible nodes in Cocos2d-X. You can't actually see a scene, but you can see most of its children, like sprites, buttons, backgrounds, etc.
### Layers (cocos2d::Layer)
 Layers are another type of invisible Cocos2d-X node. You can have multiple layers in a scene, though for the most part you'll only need one layer.
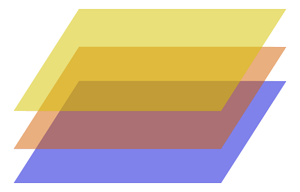
Are you familiar with the concept of layers in graphic editing software such as Photoshop? `Layer` objects stack together in a similar way, like sheets of glass. The highest `z` order is on top.
### Nodes (cocos2d::Node)
Layers, as well as scenes, sprites and everything else in Cocos2d-X, derive from `Node`.
Nodes give every element in Cocos2d-X a common functionality. All nodes have a position, for example, which can be set in order to move the node. Nodes also have anchor points, cameras, z order, rotation, scaling, flipping, skewing and basic on/off visibility.
Layers are another type of invisible Cocos2d-X node. You can have multiple layers in a scene, though for the most part you'll only need one layer.
Are you familiar with the concept of layers in graphic editing software such as Photoshop? `Layer` objects stack together in a similar way, like sheets of glass. The highest `z` order is on top.
### Nodes (cocos2d::Node)
Layers, as well as scenes, sprites and everything else in Cocos2d-X, derive from `Node`.
Nodes give every element in Cocos2d-X a common functionality. All nodes have a position, for example, which can be set in order to move the node. Nodes also have anchor points, cameras, z order, rotation, scaling, flipping, skewing and basic on/off visibility.
 A node has one possible parent and many possible children. This organizes all Cocos2d-X elements into a hierarchy. The scene is at the top of the hierarchy, then comes the layer, then sprites, backgrounds, etc.
Since a node's position is relative to its parent, moving a parent node (such as a layer) moves all of the children nodes as well. This helps to simplify the mathematics for your game. A complex system can be thought of in smaller, more simple chunks.
You can think of nodes like the leaves, branches, and root of a tree. The root is a scene. The branches and leaves are layers and nodes.
### Creating the Background & Sprite
Getting back to the `MyLayer` object created by SpriteDragger, we have the following code in the constructor:
MyLayer::MyLayer()
{
Size iSize = Director::getInstance()->getWinSize();
// create white background
auto color = Color4B(255,255,255,255);
this->colorLayer = new LayerColor;
this->colorLayer->initWithColor(color);
this->addChild(this->colorLayer, 1);
// create sprite
this->sprite = new Sprite;
this->sprite->initWithFile("Sprite.png");
this->sprite->setPosition(Point(
iSize.width / 2.0f,
iSize.height / 2.0f
));
this->sprite->setAnchorPoint(Point(0.5f, 0.55f));
this->addChild(this->sprite, 2);
// listen for touch events
auto listener = EventListenerTouchAllAtOnce::create();
listener->onTouchesBegan =
CC_CALLBACK_2(self::onTouchesBegan, this);
listener->onTouchesMoved =
CC_CALLBACK_2(self::onTouchesMoved, this);
listener->onTouchesEnded =
CC_CALLBACK_2(self::onTouchesEnded, this);
listener->onTouchesCancelled =
CC_CALLBACK_2(self::onTouchesEnded, this);
this->getEventDispatcher()->addEventListenerWithSceneGraphPriority(listener, this);
}
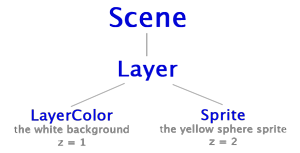
The white background color layer is created and added with a z order of 1. This puts the background low in the z order.
The sprite (our beloved yellow sphere) is then created and positioned in the middle of the screen. It is given a z order of 2 so that it is higher than the background.
Last, an event listener is created to handle touch events. The "all at once" event listener type accepts any number of touches simultaneously and triggers the specified callbacks.
### Anchor Points
The sprite is also given an anchor point which nudges the sprite upward.
You can think of an anchor point like the nail which sticks a piece of rectangular wood onto a wall. After nailing the rectangle to the wall, you can spin it around on the nail. Imagine moving the nail to a different position within the wood. You can still rotate the rectangle, but it will rotate around a different center point.
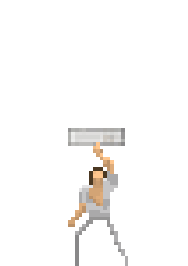
Each one of your nodes is like a piece of rectangular wood and the anchor points are the nails which stick them to the wall. In the below graphic, the green dots are the nails and the guy in the suit is the piece of wood.
A node has one possible parent and many possible children. This organizes all Cocos2d-X elements into a hierarchy. The scene is at the top of the hierarchy, then comes the layer, then sprites, backgrounds, etc.
Since a node's position is relative to its parent, moving a parent node (such as a layer) moves all of the children nodes as well. This helps to simplify the mathematics for your game. A complex system can be thought of in smaller, more simple chunks.
You can think of nodes like the leaves, branches, and root of a tree. The root is a scene. The branches and leaves are layers and nodes.
### Creating the Background & Sprite
Getting back to the `MyLayer` object created by SpriteDragger, we have the following code in the constructor:
MyLayer::MyLayer()
{
Size iSize = Director::getInstance()->getWinSize();
// create white background
auto color = Color4B(255,255,255,255);
this->colorLayer = new LayerColor;
this->colorLayer->initWithColor(color);
this->addChild(this->colorLayer, 1);
// create sprite
this->sprite = new Sprite;
this->sprite->initWithFile("Sprite.png");
this->sprite->setPosition(Point(
iSize.width / 2.0f,
iSize.height / 2.0f
));
this->sprite->setAnchorPoint(Point(0.5f, 0.55f));
this->addChild(this->sprite, 2);
// listen for touch events
auto listener = EventListenerTouchAllAtOnce::create();
listener->onTouchesBegan =
CC_CALLBACK_2(self::onTouchesBegan, this);
listener->onTouchesMoved =
CC_CALLBACK_2(self::onTouchesMoved, this);
listener->onTouchesEnded =
CC_CALLBACK_2(self::onTouchesEnded, this);
listener->onTouchesCancelled =
CC_CALLBACK_2(self::onTouchesEnded, this);
this->getEventDispatcher()->addEventListenerWithSceneGraphPriority(listener, this);
}
The white background color layer is created and added with a z order of 1. This puts the background low in the z order.
The sprite (our beloved yellow sphere) is then created and positioned in the middle of the screen. It is given a z order of 2 so that it is higher than the background.
Last, an event listener is created to handle touch events. The "all at once" event listener type accepts any number of touches simultaneously and triggers the specified callbacks.
### Anchor Points
The sprite is also given an anchor point which nudges the sprite upward.
You can think of an anchor point like the nail which sticks a piece of rectangular wood onto a wall. After nailing the rectangle to the wall, you can spin it around on the nail. Imagine moving the nail to a different position within the wood. You can still rotate the rectangle, but it will rotate around a different center point.
Each one of your nodes is like a piece of rectangular wood and the anchor points are the nails which stick them to the wall. In the below graphic, the green dots are the nails and the guy in the suit is the piece of wood.
 Cocos2d’s Node : Sprite test rotating sprites clockwise around individual anchor points
Sprites are given a default anchor point of (0.5, 0.5), which represents the center of the sprite. To move the anchor point to the lower left of the sprite, you use an anchor point of (0.0, 0.0). The upper right is (1.0, 1.0).
We give our sprite’s anchor point a slight nudge upward (0.5, 0.55) because our sprite has a shadow beneath it. This compensates for the non-symmetrical nature of our sprite file. It essentially puts our nail right through the center of our sprite’s sphere, even though it has a portion of shadow beneath it.
### Touching the Sprite
Nudging the anchor point also enables our touch math (which involves the radius of the sphere) to work flawlessly.
You’ll notice that you can only tap the circular part of the sprite to drag it. Tapping the white space around the sprite does not allow you to drag, even though there are transparent pixels in Sprite.png that are technically being tapped.
`MyLayer`'s `isTouchingSprite()` function simply calculates the distance between the touch point and the sprite's position and treats that distance like a radius. If the radius is less than 100 pixels then the sprite is being touched.
bool MyLayer::isTouchingSprite(Touch* touch)
{
auto pos = this->sprite->getPosition();
float distance = pos.getDistance(this->touchToPoint(touch));
return (distance < 100.0f);
}
This decision of whether or not the sprite is being touched happens in `onTouchesBegan()`. If the sprite is being touched, then a touch offset member variable is saved. This allows the `onTouchesMoved()` function to move the sprite (or not, if the touch offset is invalid). It also allows the `onTouchesEnded()` function to drop the sprite and animate it.
### Cocos2d-X Actions
When you let go of the sprite, you’ll see it animates a little bit by growing and shrinking. We accomplish this with Cocos2D-X actions.
Actions are an easy way to kick off a bunch of transformations, animations or events. Because Cocos2d-X handles all the timing and updating of the action, it is completely hassle-free. You just run the action and forget all about it.
You can `Sequence` actions so they happen one after the other. You can `Spawn` actions so they all happen at once. You can `ScaleBy`, `FadeBy`, `RotateBy` and a whole lot more. You can even call functions with `CallFunc`.
Here’s the code that animates our sprite when the touch is ended:
// stop any existing actions and reset the scale
this->sprite->stopAllActions();
this->sprite->setScale(1.0f);
// animate letting go of the sprite
this->sprite->runAction(Sequence::create(
ScaleBy::create(0.125f, 1.111f),
ScaleBy::create(0.125f, 0.9f),
nullptr
));
### Further References
So by now you have a pretty good understanding of the basics of Cocos2d-X, including scenes, layers, nodes, sprites, touch input and actions. If you'd like to learn more, here's a few good references:
* [Cocos2d-X.org's Wiki][5] - A good start for everything Cocos2d-X.
* [Cocos2d-iPhone.org's Docs][6] - Since Cocos2d iPhone and Cocos2d-X are the same API, this programming guide can sometimes help.
Keep in mind that you can use the SpriteDraggerX project as a template for your own Cocos2d app. Just copy and paste the whole project directory, then start renaming.
[1]: //github.com/NatWeiss/SpriteDraggerX
[2]: //github.com/NatWeiss/RapidGame
[3]: //nodejs.org/download/
[4]: //git-scm.com/downloads
[5]: //cocos2d-x.org/wiki/Cocos2d-x
[6]: //www.cocos2d-iphone.org/docs
[7]: /cpp-vs-objective-c/