Got questions? Leave a comment below. You can also subscribe to be notified when we release new chapters.
Animation & Spritesheets
A sprite is a single graphic image. It can be moved around the screen, stretched, rotated, skewed, faded and tinted.

A *spritesheet* is a collection of sprites into a single texture file. This makes it easy to animate a single sprite by changing the sprite's displayed frame in sequence over a specified duration. Just like a movie reel, a spritesheet can create the illusion of motion.

A benefit of packing your sprites into a spritesheet is that you can really optimize the texture memory required by your game. Extra spacing around your sprites can be automatically trimmed from the texture and then re-applied when loaded into an actual sprite. Rotation can be applied to the sprites so that more of them fit neatly into the texture. Compressed image formats can be used to further increase the speed and efficiency of your game. See how tightly packed these sprites are?
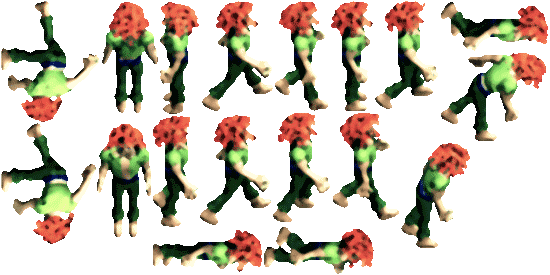
In this chapter, we'll make a ninja spritesheet and then learn how to use it in your game.
### The Ninja

The first step in making a spritesheet is deciding what sprite frames you want to include. In the case of a platformer, we just need frames of the ninja running and jumping to the right. We can flip the right-facing sprites over the x plane to create left-facing sprites.
For the running frames, we'll use ninja-running-e0000.png through ninja-running-e0007.png. For the jumping frames, ninja-sidekick-e0000.png through ninja-sidekick-e0012.png. We'll throw in a few standing frames too: ninja-stopped0000.png through ninja-stopped0003.png.
### Three Tiers of Art
These days, it can help to produce three tiers of art assets: SD, HD and HDR (HD Retina). The SD assets are used for older devices like an iPhone 3GS with a screen resolution of 480x320. The HD assets are used for devices with a screen width greater than 959 pixels, for example the iPad 1st generation at 1024x768. The HDR assets are used for devices with a screen width >= 2000 pixels or so, i.e. the iPad 3 at 2048x1536.
How does one create so many art files? Easy. Just create the art at the highest resolution (HDR) and then let the spritesheet maker scale it down for the lower tiers (SD and HD).
By taking the original SD ninja, scaling him up to HDR resolution and using a bit of median blur, we can create a decent-looking HDR sprite.
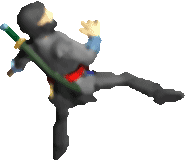
I made a folder with all the sprites I wanted to enhance, then created a Photoshop Droplet to process them all at once.
The Droplet applies a color range to get rid of the brown background color, then another color range to remove the shadow. Next the Droplet sizes the image to 400% with Bicubic Smoother image resampling. Finally, a 3-pixel Noise > Median is applied and the file is saved and closed.
Here's a zip file of the completed [HDR ninja sprites][3].
### Spritesheet Makers
A spritesheet maker takes a group of sprites and packs them together. In this tutorial, we'll use [Texture Packer][4]. Alternatively, you could use [Zwoptex][5].
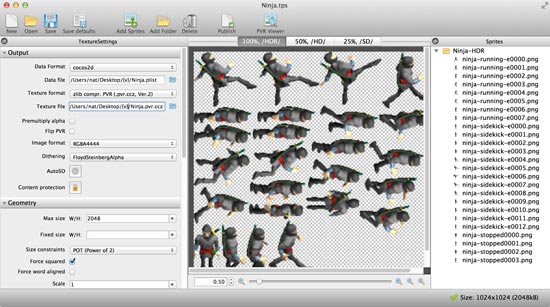
Open up TexturePacker, click the Add Folder button and select the Ninja-HDR folder. This adds all the ninja sprites to the sheet.
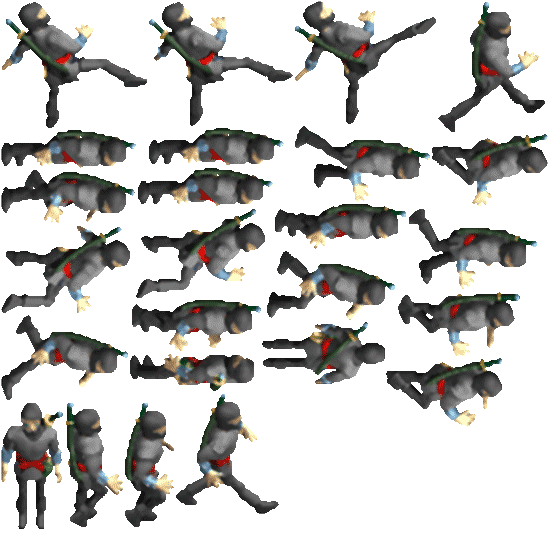
Next we'll give the spritesheet settings to ensure it creates an optimal texture, then publish it.
### Spritesheet Settings
Spritesheets are composed of a texture file and a data file. The texture file is an image (for example, a .png) and the data file is a property list (.plist) with information about each sprite frame contained in the texture.
Let’s tell TexturePacker where to export the texture and data files. Simply click the folder / “...” button next to Data file and browse to the folder where you want to save. Keep in mind that you'll want to create SD, HD and HDR folders for your game's art asset tiers. So create a folder called "HDR" and then save with the filename "Ninja".
TexturePacker will automatically add the .plist extension to create Ninja.plist and set the Ninja.png texture file as well.
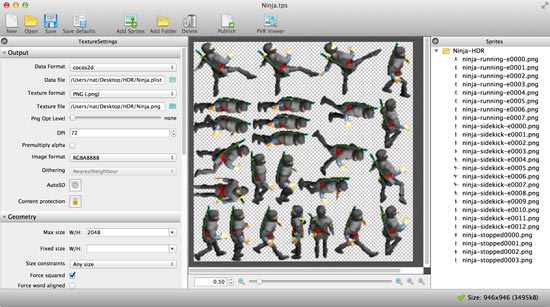
The PNG texture format, however, is uncompressed. To help your textures load faster and consume less memory, we'll use the "zlib compressed PVR" (.pvr.ccz) format. Choose it from the Texture Format drop-down. Older versions of TexturePacker might give you a warning about setting PVRImagesHavePremultipliedAlpha:YES in your code. Just click Ignore.
Check out how much memory your sprite sheet will consume when it is loaded as a texture. You can see this number in the bottom right of the TexturePacker window. It will say something like “Size: 1024x1024 RAM: 4096 kB.” Let’s see if we can decrease that texture memory usage.
### Image Format
You’ll see underneath Texture Format we have Image Format. It defaults to RGBA8888, which uses 8 bits per channel x 4 channels (red, green, blue and alpha).
Open up the Image Format drop-down and try some other options. Watch how each format affects the spritesheet’s memory usage. The preview will change to show you approximately how it will look in your game.
When you change the image format away from RGBA8888, your image quality might start to degrade a bit. To get it looking right again while still using the more memory-optimal image formats, you can try a few of the Dithering options.
Set the Image Format to RGBA4444 and the dithering to FloydSteinberg+Alpha. These will give you textures that still look about as good as RGBA8888 yet use half the memory. Your size indicator will now say something like “Size: 1024x1024 RAM: 2048 kB.”
All the other settings should be good by default. Feel free to play with them and watch how your spritesheet is affected.
### Publishing the Spritesheet
Now that you've got the settings straight, click the Publish icon. This will save your HDR/Ninja.pvr.ccz and HDR/Ninja.plist spritesheet files. But what about the SD and HD versions?
Click the AutoSD button and apply the "cocos2d-X HDR/HD/SD" preset. Next, replace "HDR" with "{v}" in the Data file and Texture file. When you go to Publish, it will automatically create a 0.5 scale sheet in your HD folder and a 0.25 scale sheet in your SD folder.
You now have an SD, HD and HDR folder with an appropriately-sized Ninja.pvr.ccz and Ninja.plist in each folder.
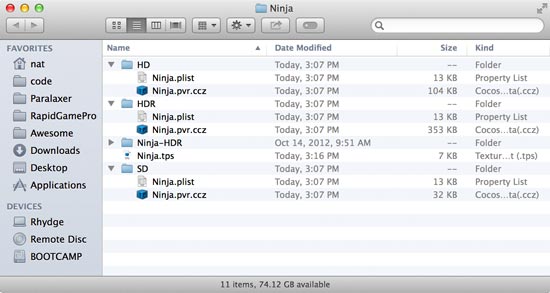
Your final TexturePacker file will look something like this:
### Using Spritesheets with Cocos2d-X
So how does one use a spritesheet with Cocos2d-X? The first thing you've got to do is load the texture file and cache the sprite frames:
// set the appropriate resource directory for this device
FileUtils::getInstance()->addSearchResolutionsOrder("HD");
// load and cache the texture and sprite frames
auto cacher = SpriteFrameCache::getInstance();
cacher->addSpriteFramesWithFile("Ninja.plist");
Here's how to create a sprite using one of the sprite frames:
Sprite* someSprite = new Sprite;
someSprite->initWithSpriteFrameName("ninja-stopped0000.png");
To individually get one of the sprite frames:
// get the sprite frame
SpriteFrame* frame =
cacher->getSpriteFrameByName("ninja-sidekick-e0007.png");
// set someSprite's display frame
someSprite->setSpriteFrame(frame);
To play an animation:
#include
// load all the animation frames into an array
const int kNumberOfFrames = 13;
Vector frames;
for (int i = 0; i < kNumberOfFrames; i++)
{
stringstream ss;
ss << "ninja-sidekick-e" << setfill('0') << setw(4) << i << ".png";
frames.pushBack(cacher->getSpriteFrameByName(ss.str()));
}
// play the animation
Animation* anim = new Animation;
anim->initWithSpriteFrames(frames, 0.05f);
someSprite->runAction(Animate::create(anim));
That's it for the code examples. If you'd like to see what else you can do with a `SpriteFrame`, just open Xcode, hold the Command key and click on `SpriteFrame`. You'll be taken to the `SpriteFrame` class interface, where you can peruse the methodology.
### Conclusion
That's all for this chapter.

[1]: /game-source-code/cocos2d-x-platformer-engine/
[2]: //www.reinerstilesets.de/
[3]: /assets/book/cocos2d-x/Ninja-HDR.zip
[4]: //codeandweb.com/affiliate/cocos2d-x-book
[5]: //www.zwopple.com/zwoptex/
[6]: /book/cocos2d-x/tilemaps-box2d/
