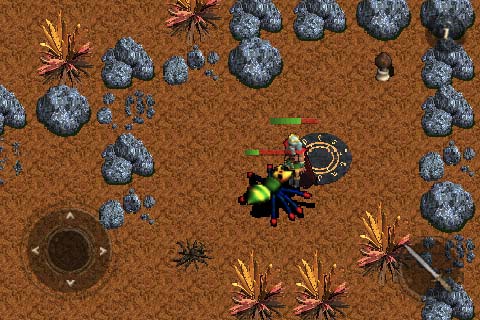
A screenshot of the iPhone game QuexlorLite showing it’s D-pad / joystick controls
A Walkthrough Tutorial for Objective C / iPhone SDK Beginners
So you want to learn how to program an up, down, left, right D-pad for your iPhone game, eh? All right. Let’s get started.
The Graphics
First thing to do is make the graphics. Use your favorite graphical editor (mine is Photoshop) and come up with something like this:
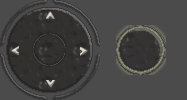
This is a picture of the two elements of the joystick laid out next to each other. The first element is the D-pad background, which has arrows for up/north, right/east, down/south, and left/west. The second is the joystick’s button that moves with your thumb. If you are artistically challenged, then feel free to crop these elements from the image (I promise I won’t tell anybody).
Loading the Graphics
At this point, you’re going to need a working game engine. I highly recommend Cocos2D because it is easy to use and has plenty of support from it’s author (his name is Ricardo) and the Cocos2D community.
Once you have a game engine you are also going to need some basic game code to start with. If you are new to all this, you can download the source code to the iPhone game QuexlorLite and use it as a base for your own game.
Now that you have a game to work with, the first thing we need to do is add a few member variables to our Heads-Up Display (HUD) Layer:
// in Hud.h
@interface HudLayer : CCLayer
	{
		CCSprite* joypad,*joybtn,
		CGPoint touchPos;
		float joybtnDistSquared,joybtnAngle;
		BOOL isMovingJoybtn;
	}
Then we load the graphics:
-(id) init
{
	self = [super init];
	if(self != nil)
	{
		// set this so we can register with touch dispatcher
		isTouchEnabled = YES;

		// load our joystick background
		joypad = [[CCSprite spriteWithFile:@"joypad.png"] retain];
		joypad.position = ccp(70,70);
		joypad.opacity = 0;
		[self addChild:joypad z:1];

		// load joypad button
		joybtn = [[CCSprite spriteWithFile:@"joybtn.png"] retain];
		joybtn.position = ccp(70,70);
		joybtn.opacity = 0;
		[self addChild:joybtn z:2];
	}
	return self;
}
The graphics are loaded using Cocos2D’s handy spriteWithFile method. This method returns a CCSprite pointer that we retain (and release in the dealloc).
The joystick button is placed on top of the joystick background, ready for us to move it with our thumb.
The Professional Touch
We set the opacity of each joystick element to zero (effectively making it transparent) and then nicely fade it in and make it blink when the game starts using code like this:
[joypad runAction:[CCSequence actions:
	[CCDelayTime actionWithDuration:1.5f],
	[CCFadeTo actionWithDuration:1.5f opacity:192],
	[CCBlink actionWithDuration:0.66f blinks:3],
	nil]];
This launches a sequence of actions: 1) delay a second and a half, 2) fade in to 75% opacity over a second and a half, and 3) blink three times over two thirds of a second.
Responding to Touch Events
In order to move the joystick button, we need to respond to touch events. Here’s a little blast of code which does that:
-(BOOL) ccTouchBegan:(UITouch*)touch withEvent:(UIEvent*)event
{
	// started touching somewhere in the joystick pad?
	if( !isMovingJoybtn && [self isTouchingJoybtn:touch] )
	{
		touchPos = joypad.position;

		// initially move the joystick button to touch point
		[self moveJoybtn:touch];

		// we are now moving the joystick button
		isMovingJoybtn = YES;
	}

	// returning YES means we claim the touch
	// (always return YES because we want to claim
	// touching the whole screen when player dies)
	return YES;
}

-(void) ccTouchMoved:(UITouch*)touch withEvent:(UIEvent*)event
{
	// keep moving the joystick button
	if( isMovingJoybtn )
		[self moveJoybtn:touch];
}

-(void) ccTouchEnded:(UITouch*)touch withEvent:(UIEvent*)event
{
	// stop moving joystick
	[self stop];
}

-(void) ccTouchCancelled:(UITouch*)touch withEvent:(UIEvent*)event
{
	// stop moving joystick
	[self stop];
}
When we first touch the iPhone’s screen, we get the ccTouchBegan message. As long as we are still touching the screen, we continue to get the ccTouchMoved message. When we finally let up, we get ccTouchEnded. Pretty self-explanatory, eh?
Our ccTouchBegan method is where most of the magic happens. We basically check to see if the touch point is within the boundaries of the joystick background using the isTouchingJoybtn method, and if so we store information on the touch and begin the joystick button’s movement.
The Pythagorean Theorem

Since the joystick background is a circle, we need some special code to determine whether our thumb is touching it. A rectangle test would be far too square. Thankfully, we can return to our roots and deploy a simple geometrical equation to help us. Anybody remember A squared plus B squared equals C squared?
In our case, A is the X distance from the thumb to the joystick center, B is the Y distance, and C is the diagonal distance (or radius).
The distanceFromJoypadSquared method simply calculates this radius. We then use it in the isTouchingJoybtn method to finally determine YES or NO whether the thumb is touching the joystick:
-(CGFloat) distanceFromJoypadSquared:(CGPoint)p
{
	// remember a squared + b squared = c squared?
	return ccpLengthSQ(ccpSub(p, joypad.position));
}

-(BOOL) isTouchingJoybtn:(UITouch*)touch
{
	// the joypad is a circle, so return yes if
	// distance from center is less than radius
	CGFloat c2 = [self distanceFromJoypadSquared:touchToPoint(touch)];
	return (c2 < kJoypadRadiusSquared);
}
Moving the Joystick Button
When we move the joystick button, we need to 1) make sure the joystick button does not move outside the boundaries of the joystick background, and 2) store the angle and distance of the joystick button so that we can use it to control our main character.
-(void) moveJoybtn:(UITouch*)touch
{
	// get previous touch point and determine offset
	CGPoint prev = (isMovingJoybtn ? touchToPreviousPoint(touch) : joybtn.position);
	CGPoint offset = ccpSub(touchToPoint(touch), prev);

	if( offset.x || offset.y )
	{
		// get new purported joybtn position and delta to joypad center
		touchPos = ccpAdd(touchPos, offset);
		CGPoint delta = ccpSub(touchPos, joypad.position);
		CGPoint newPos = touchPos;

		// get its angle and distance
		joybtnAngle = ccpToAngle(delta);
		joybtnDistSquared = [self distanceFromJoypadSquared:newPos];

		// clamp it inside the joypad
		if( joybtnDistSquared > kJoypadRadiusSquared )
		{
			newPos = ccpAdd(joypad.position,
				ccpMult(ccpForAngle(joybtnAngle), kJoypadRadius));
			joybtnDistSquared = kJoypadRadiusSquared;
		}

		// set it to the new position
		[joybtn setPosition:newPos];
	}
}

-(void) stop
{
	isMovingJoybtn = NO;
	joybtn.position = joypad.position;
}
The moveJoybtn method starts by calculating the previous touch position and the offset to the current touch position. It then adds the offset to the existing joystick button position to calculate the delta, or the desired new joystick button position. The angle of this delta is then saved for later and the joystick button is clamped within the boundaries of the joystick background.
Controlling the Main Character
We now have one particular member variable which will come in quite handy when we want to move the main character around the screen. It is called joybtnAngle. This angle can be used to smoothly move the character around the screen (like in the video below) or it can be "snapped" to one of the eight compass directions in order to give your game a more retro D-pad feel.
You can download the entire working source code to the game QuexlorLite to see this joystick code in action, complete with the snapping of the joystick angle to one of the eight compass directions.
Enjoy coding!


Hi Nat thanks for the joy pad tutorial.
I wanted to ask is the source code for QuexlorLite available for free.
Thanks again for the wonderful tutorials