Wizard Fu's Cocos2dx Platformer Game Engine v1.0.1
wizard@wizardfu.com
README.md
 __      __.__                         .___
/  \    /  \__|____________ _______  __| _/
\   \/\/   /  \___   /\__  \\_  __ \/ __ |
 \        /|  |/    /  / __ \|  | \/ /_/ |
  \__/\  / |__/_____ \(____  /__|__\____ |
       \/           \/     \/\_   _____/\/__
           .:.                |    __)|  |  \
          `-+s+-              |     \ |  |  /
          od++sh-             \___  / |____/
       `  `-::::.                 \/
       `-.:`oos.
         `/.ssy-
           `sys.
            osy/`
          ./osyy/-`
         -/--`./y.`
Hi. :) Welcome. This is the readme for Wizard Fu’s cross-platform platformer game engine.
One way to get started with the engine is to open a particular platform’s project file and run the demo game. From there you can move on to renaming the project, swapping in new art assets, tweaking the engine and creating worlds.
When you’re ready to dig into the code, check out the Table of Contents at the bottom of any page for the complete documentation on each of the objects. The documentation also includes a list of tmx object properties you can use when making levels in Tiled.
What follows is a description of how to get started on the main platforms.
iOS / Mac
You’ll need Xcode (it’s free).
Open Projects/Platformer.xcodeproj with Xcode, select the iOS or Mac scheme, then build and run.
The iOS scheme produces an app playable in the iOS Simulator or an actual iPad, iPhone or iPod Touch, depending on choice of destination.
An archive build (menu command Product > Archive) will produce an archive that can be distributed to an app store, ad-hoc via an IPA file or through services like Testflight.
The Mac scheme produces a playable Mac app.
The default build configuration is Debug, which logs information to the console and uses as much of the screen as it can in windowed mode.
Set the scheme to Mac Release to use build configuration Release, which disables the debugger (to prevent hanging on a crash) and runs in fullscreen mode.
Get started customizing your game by renaming the project. Click once on the project name in the Project Navigator (by default, this is the leftmost pane). Click again on the project name to edit it. Confirm your choice and Xcode will rename the project, files and targets.
Windows
You’ll need Visual Studio (there is a free express version).
Open the Projects/win32/Platformer.sln with Visual Studio, then build & run.
The build produces a folder with an exe file, dlls and assets needed to play the game.
This folder will be Debug-win32 or Release-win32 depending on current configuration.
The release build will run in full screen mode. The debug build runs in a windowed mode.
Android
You’ll need to set up an Android development environment.
Open Eclipse, do Help > Check for Updates, then go Window > Android SDK Manager and install the following:
- Android SDK Tools
- Android SDK Platform-tools
- Android SDK Build-tools
- Android 4.3 (API 18)
- Android 2.3.3 (API 10)
- Android 2.2 (API 8)
Edit your
~/.profile(or~/.bash_profile). DefineANDROID_HOME,NDK_ROOTand add a few places to your path:export ANDROID_HOME=~/path/to/your/android/sdk/export NDK_ROOT=~/path/to/your/android/ndk/PATH=~/path/to/your/android/sdk/tools:~/path/to/your/android/sdk/platform-tools:~/path/to/your/android/ndk:"${PATH}"
On Linux, make sure you’ve installed ANT:
sudo apt-get install ant
Android: Eclipse
To build for Android with Eclipse, you’ll need to create an Eclipse project. Open up Eclipse, do File > New > Other… and choose Android > “Android Project from Existing Code”. Then browse and set the Root folder to Projects/android and click Finish.
Next, repeat the same process for cocos2d-x. File > New > Other… > Android Project from Existing Code and choose lib/cocos2d/x/java/cocos2d-x. Now Eclipse is ready to go. See Projects/android/README.md for details.
Android builds produce apk files that can be installed on Android devices or simulators using Eclipse or the build tools.
Android: Commandline
To build via the commandline with ANT:
- Open up a Terminal or Command prompt and change to the
Projects/androiddirectory. - Execute:
make - This will produce an apk file in the
bindirectory.
To run the apk file on a device:
- Connect an Android device via USB and enable USB debugging mode.
- Execute:
make run - Tap to start the app on the device and watch your Terminal window for
logcatoutput.
Android: Emulator
To run the Android emulator you’re going to need to create an Android virtual device:
- Run the Android Virtual Device manager.
- Click “New” to create a new virtual device.
- Give it the name “my_avd”.
- Choose a target that is at least Android 4.0.3 API Level 15.
- Choose x86 or ARM from the CPU drop down.
- In the Hardware section, choose “New”, select “GPU Emulation” from the drop-down and click “Ok”.
- Now double click the GPU Emulation value “no”, change it to “yes” and click somewhere else in the window to get it to “stick.”
- Click “Create AVD”.
- Now you can install your app in the emulator from the commandline like this:
make && make run-emulator
Browsing the code
We’ve organized the code into a table of contents (found at the bottom of each page of documentation) with four columns:
- Core. This contains the
Kit,Game,Input,PhysicsandMultiplayerclasses. - Scenes. Includes
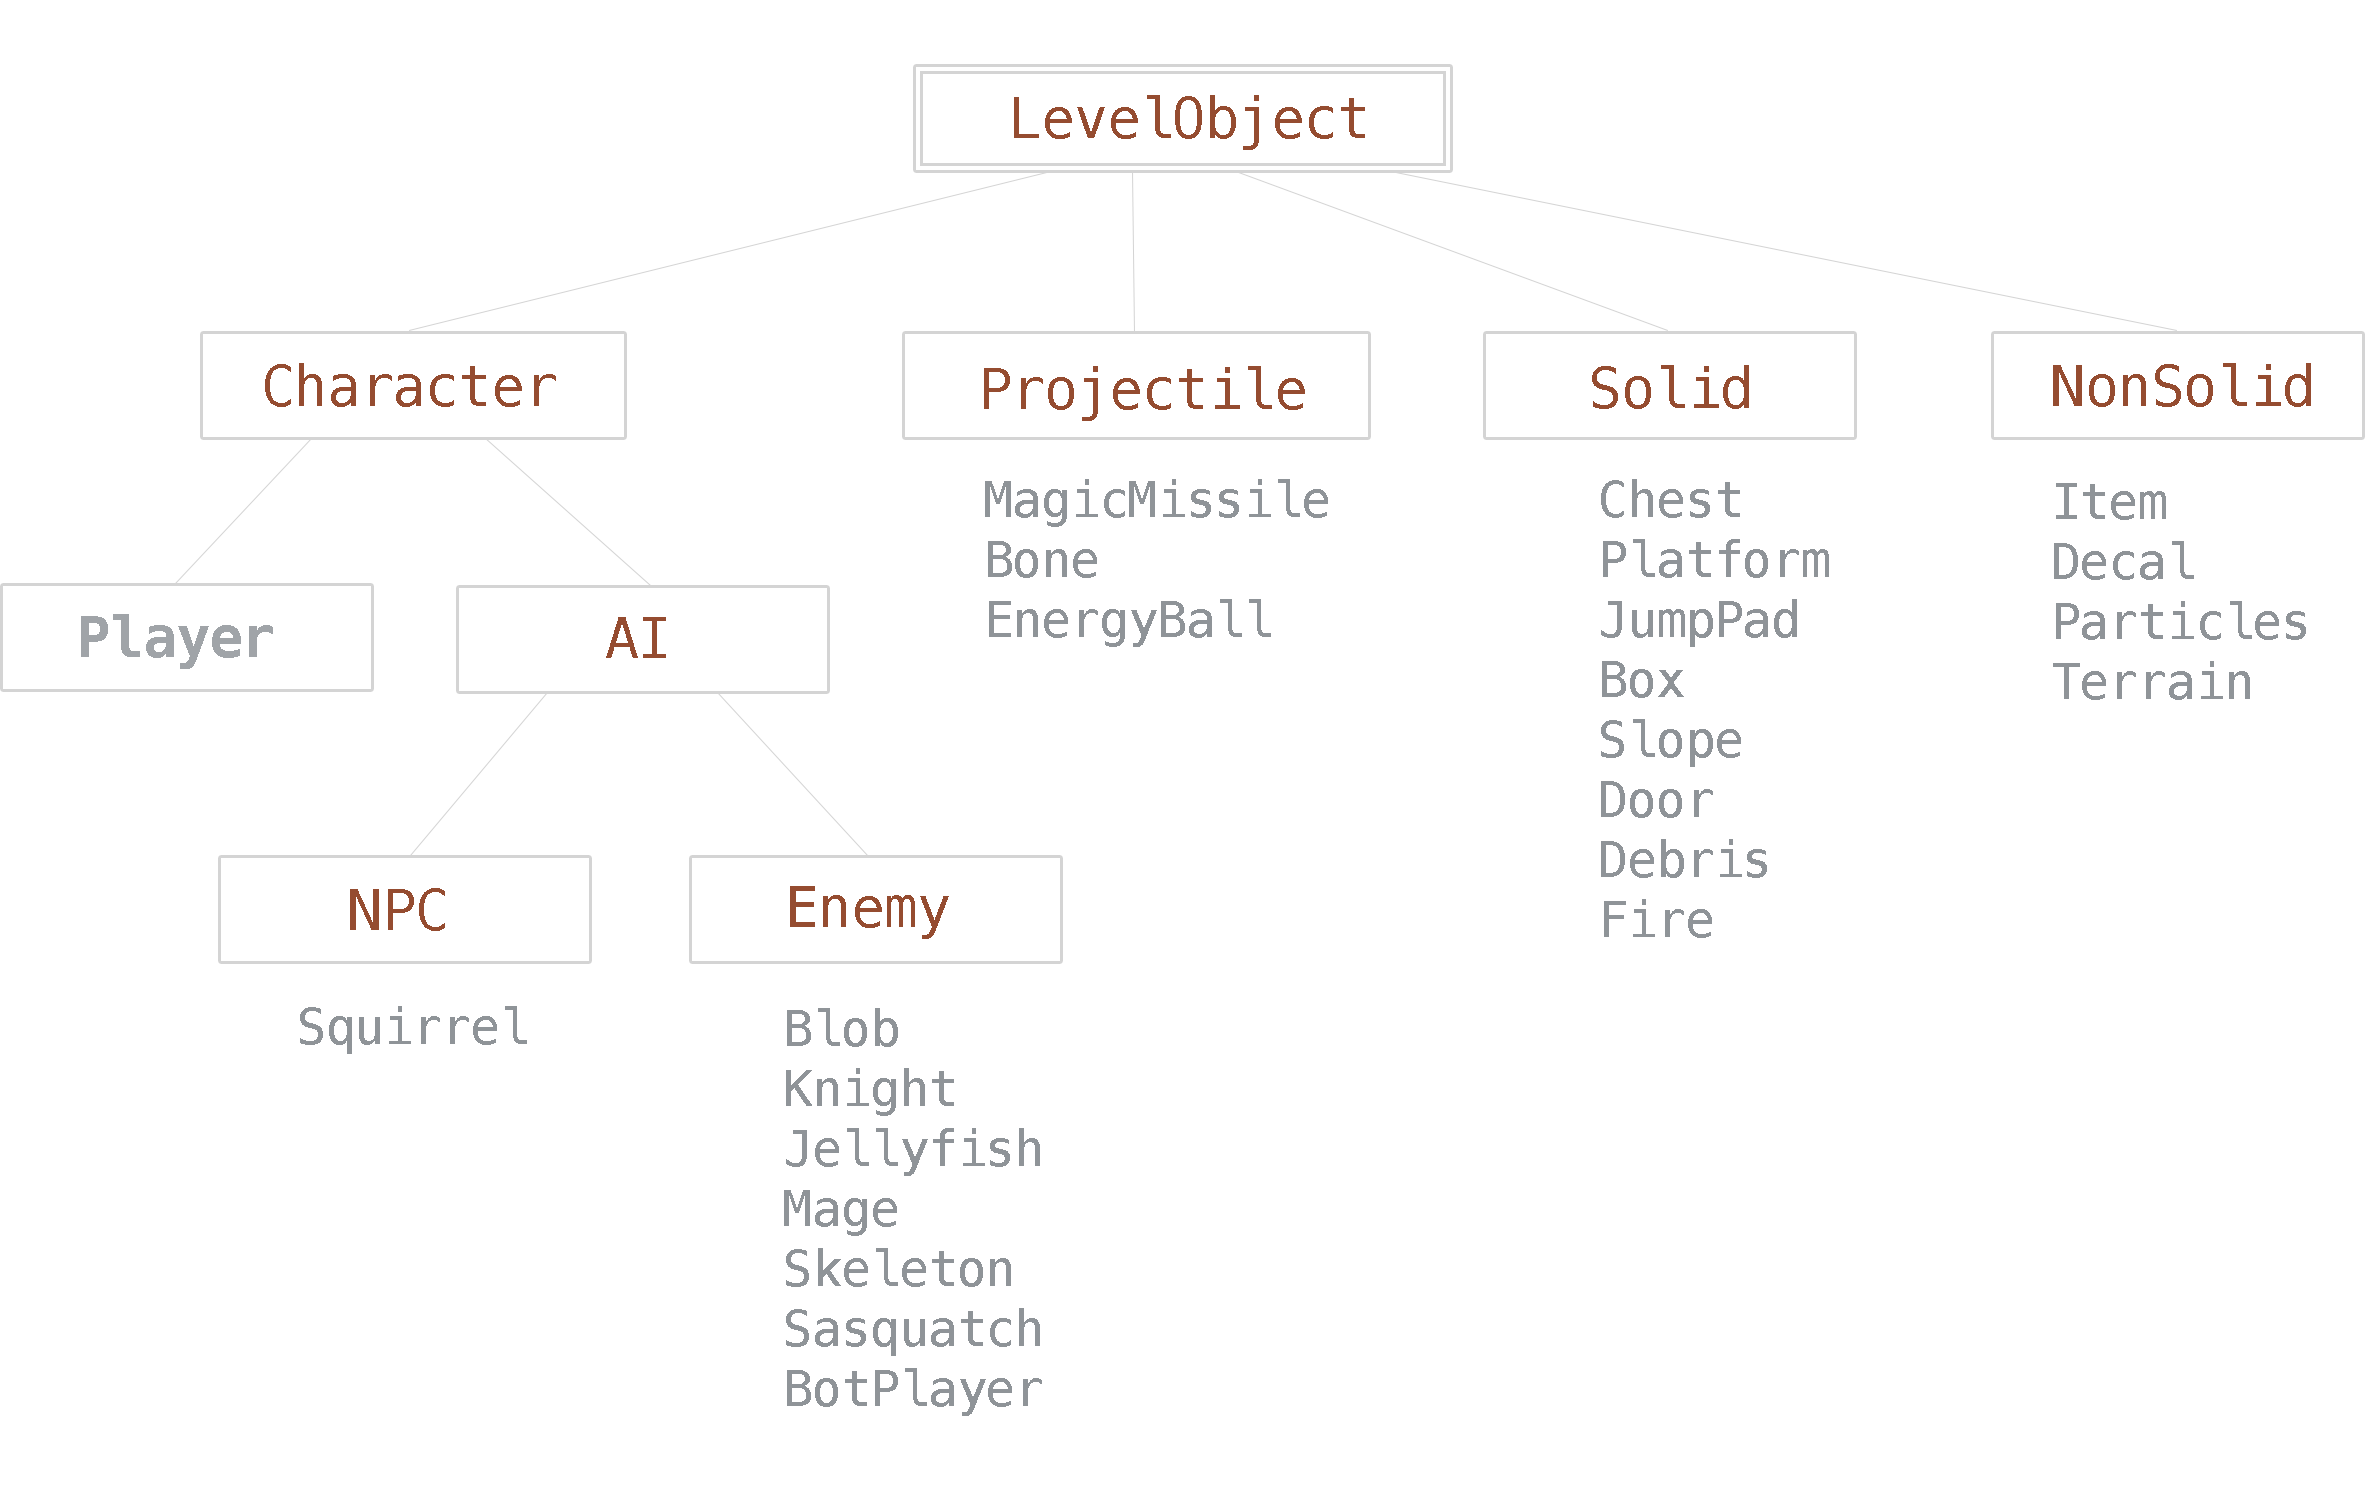
SplashScene,TitleScene,LevelSceneandLevel. - Object types. These are the base classes that the actual objects derive from. Includes
LevelObject,Character,AI,EnemyandNPC. - Objects. The objects used by the game engine. Objects include
Player,Knight,Item,Chest,Door,Platform,Particlesand more.
We’ve created this class hierarchy diagram to help visualize the objects. The names in red are abstract base classes. The names in gray are instantiatable.
Icons
We’ve included a makefile which will copy the icons files in Raw/Icons to all the appropriate projects.
To change your game’s icon, simply execute cd Raw/Icons and then make.
We recommend using these app icon templates by Michael Flarup.
Building the Static Libraries
The platformer game engine uses prebuilt cocos2dx static libraries. They can increase the speed at which developers write games with cocos2d-x, as the library does not have to be rebuilt so often.
This download includes a few prebuilt cocos2dx libraries in the lib folder.
You may want to build your own static libraries. Here’s how:
- Remove or rename the
libdirectory. - Install Node.js.
- Install Git.
- Install RapidGame:
sudo npm install rapidgame -g - Prebuild cocos2d-x libraries:
rapidgame prebuild - Symlink to the latest libraries:
cd MyGameDir && rapidgame init .
Contact
Thanks for your purchase! Feel free to write me (Nat Weiss) at wizard@wizardfu.com with questions or even just to say hello. If you think of something that can be better about this platformer game engine, please share.
Follow your excitement.
— Nat
Table of Contents
Core
Object types